I’ve been waiting a while to see this day and a sneaky section of the Citrix XenDesktop/PVS 7.12 notes indicate not only a lot more stability for the VDA Agent on RHEL but also that PVS supports (again) Linux targets!
If you’re not familiar with RHEL 7.x (7.3 in this case) you likely can use the same methods with CentOS 7 and Fedora. If you don’t have a RHEL subscription, I would urge you to use CentOS 7, however, you can get a RHEL 7 subscription on the Developer portal (register here) (note it may just say 7.2 but once you run yum update and reboot it’ll be 7.3).
Let’s set the stage with what we are doing here. We will be installing Red Hat Enterprise Linux (RHEL) Workstation 7.3 and configuring it to be a VDI Desktop in Citrix XenDesktop 7.12. We are also using PVS 7.12 to stream a gold image to a VM that PXE boots and uses a cache disk (I choose to use cache to RAM overflow to disk). Everything below is done as root for now. If you don’t like that, feel free to do it your own way but this is just a workstation we’re talking about here.
Install RHEL 7 Workstation
First thing you should do is install a VM, I’m using RHV4 and my VM consists of 2GB Memory, 1 vCPU and a 20GB disk. The installation follows the guidelines in the documentation. While their is an easy install option, we want to use the recommended best practice from Red Hat and leverage SSSD rather than samba.
First thing to notice is you need to scroll down to the section entitled “Prepare RHEL7/CentOS 7 for VDA Installation” which is not the first one (that is RHEL 6). Make sure you install Workstation and subscribe to get updates. If you’re using RHEL you’ll need to run something similar to this
subscription-manager register
subscription-manager attach --pool={POOLID}
subscription-manager repos --disable=*
subscription-manager repos --enable=rhel-7-workstation-rpms \
                           --enable=rhel-7-workstation-extras-rpms \
                           --enable=rhel-7-workstation-optional-rpms \
                           --enable=rhel-7-workstation-rh-common-rpms
yum clean all
yum install screen wget vim bash-completion git
yum update -y
#reboot if kernel is updated
systemctl reboot
#for ovirt/rhv I will install guest tools
yum install -y rhevm-guest-agent
#if there is a bridge reported you might need to remove it before proceeding
#this would show up as some 192.x.x.x address in addition to your desired IP
#that wont play well with PVS and the VDA generally
#if that happens you can remove them with
#virsh net-destroy default
#virsh net-undefine default
#ifconfig #shouldnt have a virbr0 anymore
Follow the guide for setting the hostname and check hostname and hostname -f return the right values. The command below enforces the hostname immediately.
hostnamectl set-hostname myhostname
Now modify chrony.conf for your ntp servers. You can use the following if you wish to run this in bash. Replace the IP addresses with the correct ones. (make sure you scroll to the right as the lines are long if you’re copy/pasting here)
sed -i 's/server 0.rhel.pool.ntp.org iburst/#server 0.rhel.pool.ntp.org iburst/g' /etc/chrony.conf
sed -i 's/server 1.rhel.pool.ntp.org iburst/#server 1.rhel.pool.ntp.org iburst/g' /etc/chrony.conf
sed -i 's/server 2.rhel.pool.ntp.org iburst/server 10.1.10.92 iburst/g' /etc/chrony.conf
sed -i 's/server 3.rhel.pool.ntp.org iburst/server 10.1.10.2 iburst/g' /etc/chrony.conf
systemctl restart chronyd
For JAVA, this is strange but if you use the default RHEL7 install the docs won’t work, that’s because they don’t have a symlink where Citrix says there is. You should have java already installed if you’re using RHEL. I would recommend installing 1.8.0-openjdk and don’t remove the 1.7.0 if you’re using RHEL 7.2+ or CentOS7. The path you want is /etc/alternatives/java. Let’s set it and source it in .bashrc (this will now always be a variable when you log in).
echo "export JAVA_HOME=/etc/alternatives/java" >> ~/.bashrc
. ~/.bashrc
Installing postgres should be simple, you can initialize without fear before we seal/clone so let’s do that.
yum install postgresql-server postgresql-jdbc -y
postgresql-setup initdb

systemctl start postgresql
systemctl enable postgresql
At this point you are ready for stage 2, the AD prep. If you’re using XS or ESXi read the appropriate sections in the document. I use Red Hat Virtualization because I like to live dangerously (and they also are my employer).
Active Directory Join (well not really)
This part can actually be done entirely and then we can remove the VM from the domain and clear credentials. This isn’t a bad thing and if you do this, you’ll just want to leave the domain and delete the /etc/krb5.keytab (plus a few other things). However we are going to do everything but join the domain at this point and leave that for later.
I HIGHLY SUGGEST you take a snapshot at this point. If you love repeating steps (like the ones above, then ignore me but more than likely you’re going to mistype something here and need to revert).
Winbind sucks, so skip that part. We’re going with the latest, greatest SSSD. My colleague, Dmitri Pal, discusses the best practice here if you’re a diehard winbind junkie.
Let’s run authconfig but also, we can specify all our variables up front now so you can just copy and paste and get on with life. You can download them from this github and modify. Just follow the commands below
git clone https://github.com/magicalyak/citrixpvslinux.git
cd citrixpvslinux
vim variables.sh #edit the file changing the options particularly the line on the Auth method to 4 if you're using SSSD
chown root:root variables.sh
chmod 600 variables.sh
. ./variables.sh
If you type export and hit enter you should see the variables loaded for you. We only want them for configuration so we load them now by sourcing the file (the . command above) and we will again after we create the gold image.
Let’s run our authconfig command now and modify the /etc/samba/smb.conf. You can run the github script or follow along. We aren’t joining the domain just yet though.
authconfig --smbsecurity=ads --smbworkgroup=${ADJOIN_SHORT} --smbrealm=${ADJOIN_REALM} --krb5realm=${ADJOIN_REALM} --krb5kdc=${ADJOIN_DC} --update
sed -i '/#--authconfig--end-line--/a kerberos method = secrets and keytab' /etc/samba/smb.conf
We will now prep the image a bit more for the PVS section, here we are writing in a file using our variables. You should check the file to be sure it looks right
cat >/etc/sssd/sssd.conf <
Now we are going to create a service that will join the machine to AD at boot time. We have to store the password in that file so we secure it, like we did above, with only root access. This means you MUST be root to run this and access the file. Since we are going to join the machine with the command I HIGHLY suggest a minimum privileged account for this. This guy seems to have a good walkthrough if you need one. I also suggest you make an OU for the machines and add it as I have (it’s a variable in the export). If you don’t do this, you’ll need to make the variable “Computers” or modify the command to join.
I suggest you use the github script and not copy and paste below.
#!/bin/bash

cat >/etc/systemd/system/ctxvdaoneshot.service < /usr/local/sbin/ctxvdaoneshot
chmod 700 /usr/local/sbin/ctxvdaoneshot

cat >>/usr/local/sbin/ctxvdaoneshot <
To use this we would actually run ‘systemctl enable ctxvdaoneshot.service’ but we’re not quite ready yet.
At this point we’re as far as we’re going to get on AD without actually joining the machine. So let’s fix some issues that are going to pop up (I didn’t see any notes on this but you likely need to make these changes, otherwise your users will get some warnings)
Fixing the Display Issues
Run the following to fix the popups that occur if someone has a printer or moves the screen. Most guest tools leverage VNC and this will prompt some security warnings (you can hit cancel and ignore them) about the color management and one about proxy for updates. These are annoying and not easily fixed. So the steps below will fix these issues by ignoring those warnings for anyone in the Domain Users group. Github script here.
(Update: Citrix had a ctx article on this now – https://support.citrix.com/article/CTX219692)
sed -e '$aX-GNOME-Autostart-enabled=false' -e '/X-GNOME-Autostart-enabled/d' -i.bak /etc/xdg/autostart/gnome-software-service.desktop

sed -i 's/Exec=\/usr\/bin\/vmware-user-suid-wrapper/#Exec=\/usr\/bin\/vmware-user-suid-wrapper/g' /etc/xdg/autostart/vmware-user.desktop

cat >/etc/polkit-1/rules.d/02-allow-colord.rules <
If you have GRID cards then good for you. I don’t so I’m not going over that part. However, if someone were to donate some to me I’d be happy to add that part, straight up trade.
Install the VDA Agent
Ok now we need to install this agent. You need to actually download the rpm and put it somewhere. I use a local http server but you can just put it in the root directory. scp works great for this. If you’re on a mac the command is something like:
scp ~/Downloads/Citrix/XenDesktopVDA-7.12.0.375-1.el7_2.x86_64.rpm root@linuxvdafqdn:/root
# prompts for password of root and it will copy
# lets also copy the PVS agent (it is on the ISO for PVS 7.12)
scp ~/Downloads/Citrix/pvs_RED_HAT_7.12.0_BETA5_9201_x86_64.rpm root@linuxvdafqdn:/root
You should now have two rpm files in your ~ or /root directory. I guess you could use Citrix’s commands in the doc but I don’t do that. I generally always use the following for RPMs I find. You can also use this for an rpm on a http site (just replace the location with the web address).
# install prerequisites if not already installed (it should warn you if not)
yum install -y ImageMagick motif foomatic-filters
rpm -Uvh ~/XenDesktopVDA-7.12.0.375-1.el7_2.x86_64.rpm
systemctl enable ctxhdx ctxvda
You may also need to fix the AD shortname. I did. To do this create the file /tmp/ctxinstall.conf and add the following line (replace AD with your netbios short name)
workgroup=AD
At this point we’ve completed the VDA setup without having joined the machine to the domain. A reboot and snapshot is advisable at this point.
systemctl poweroff
# take a snapshot
# bring it back up
# source variables
cd ~/citrixpvslinux
. ./variables.sh
PVS Install
You should have the rpm in the /root directory or somewhere. Let’s go ahead and install it along with a prerequisite.
yum install -y tdb-tools
rpm -Uvh ~/pvs_RED_HAT_7.12.0_BETA5_9201_x86_64.rpm
The following commands are in this github script but you can follow along. We need to set selinux to permissive. This kind of sucks but another day I’ll work through that. What you don’t want to do is disable selinux, you should NEVER be doing that honestly unless you’re exploring exploits or somehow time travelled prior to Y2K (buy some stock while you’re there!). Anyway let’s get this done. I’m assuming selinux contexts aren’t transcribed properly when we stream the OS disk.
# Set to permissive for the immediate timeframe
setenforce Permissive
# Set it to persist on reboot (if you dont do this it will revert to enforced)
sed -i 's/SELINUX=enforcing/SELINUX=permissive/g' /etc/sysconfig/selinux
We also want to add our CA Trust because PVS runs securely now and the linux target need to trust the issuer. You could use the option for self-signed in the citrix docs, but I’m assuming you’re serious about this and have a CA somewhere you can spin up a cert for. You can grab the cert from the CA by using this command (it’s also part of the script).
openssl s_client -showcerts -connect ${ADJOIN_CA}:443 /dev/null|openssl x509 -outform PEM > /etc/pki/ca-trust/source/anchors/${ADJOIN_CA}.pem
# or copy the ca to /etc/pki/ca-trust/source/anchors
update-ca-trust extract
Now let’s add a Cache Disk for PVS to use, I set mine up for 10G and created it without rebooting or shutting down. My main disk is /dev/vdb and the new disk is /dev/vda. I think you need to have the PVS_Cache be the first disk because linux won’t preserve naming automatically. If you used my script from github at this point, just ensure the variables are right and run it or run the following.
#export TGTDEV=/dev/vda
sed -e 's/\s*\([\+0-9a-zA-Z]*\).*/\1/' << EOF | fdisk $TGTDEV
 o # clear the in memory partition table n # new partition p # primary partition 1 # partition number 1 # default - start at beginning of disk # default, extend partition to end of disk p # print the in-memory partition table w # write the partition table q # and we're done EOF
mkfs.xfs -L 'PVS_Cache' ${TGTDEV}1
After this it’s time to seal up and convert our VM to a PVS image. You’ll want to remove the subscription-manager info also to clear that for use but you can leave the hostnames alone since PVS will change them for you. The github script for this part is here.
Let’s cleanup yum and also enable the vdaoneshot script too. We assume you have the collection, store name and all that info correctly inputted to the variables.sh or export.
yum clean all
subscription-manager unregister
subscription-manager remove --all

systemctl enable ctxvdaoneshot

# Lets create this
pvs-imager -C -a ${PVS_IP} -u ${PVS_USERNAME} -p ${PVS_PASSWORD} -d ${ADJOIN_SHORT} -P ${PVS_PORT} -S ${PVS_STORE} -c ${PVS_COLLECTION} -n ${PVS_DEVICENAME} -v ${PVS_VDISKNAME} -D ${DISKDEV}

echo "If something went wrong please run: systemctl disable ctxvdaoneshot"
echo "before rebooting...."
echo "If you succeeded, please clone this image and remove the OS disk"
echo "Then create a template, create the VMs and add them to the collection in PVS"
echo "DO NOT FORGOT to set the boot order to use the NIC first"
echo "You also should have options 66/67 set in DHCP (they are the same old options from years ago)"
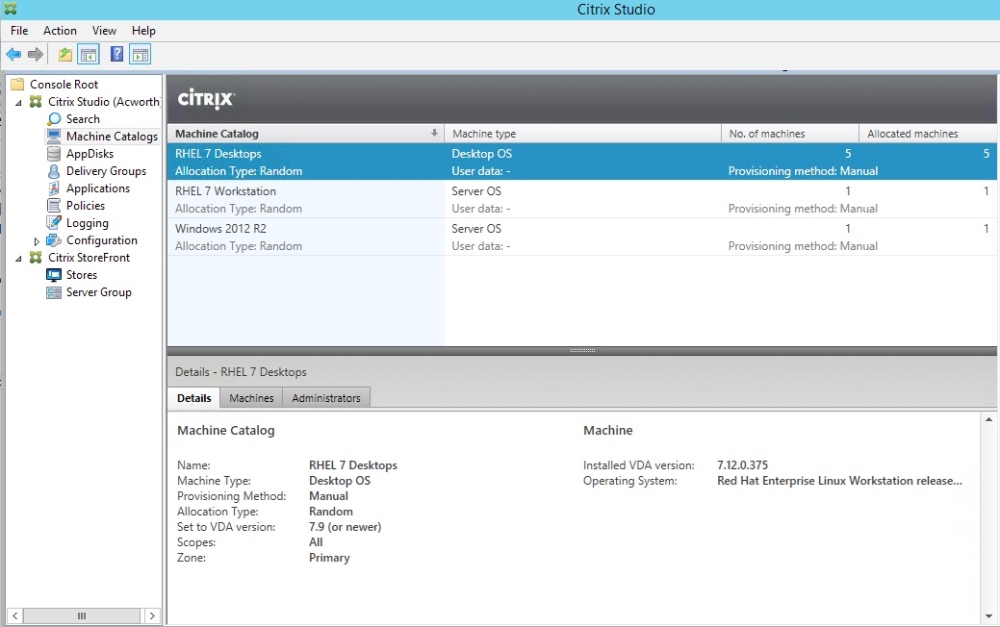
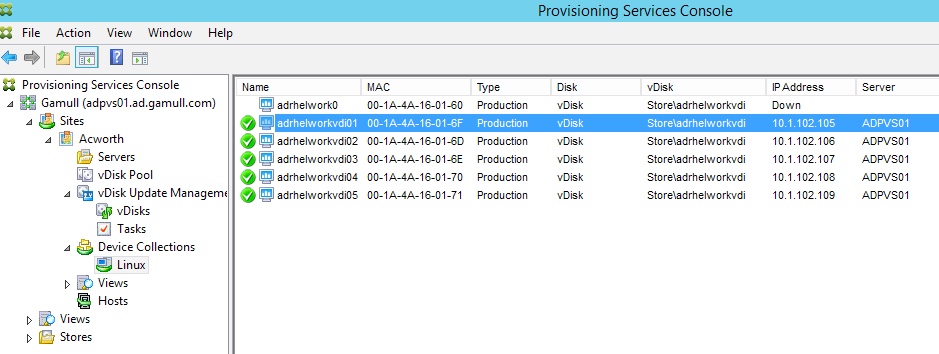
At this point you should be creating your image. You’ll want to clone, remove the OS disk and then make additional VMs based on that VM. I had to manually create the additional VMs in PVS, transcribing the MAC addresses but it works. This method creates Desktop VDI machines so select that when you create the machine catalog and delivery groups in XenDesktop.
Once all is complete you should be able to see your images and launch a desktop!
EDIT (12/22/16): I wanted to also mention the setup on the PVS side and XD side.
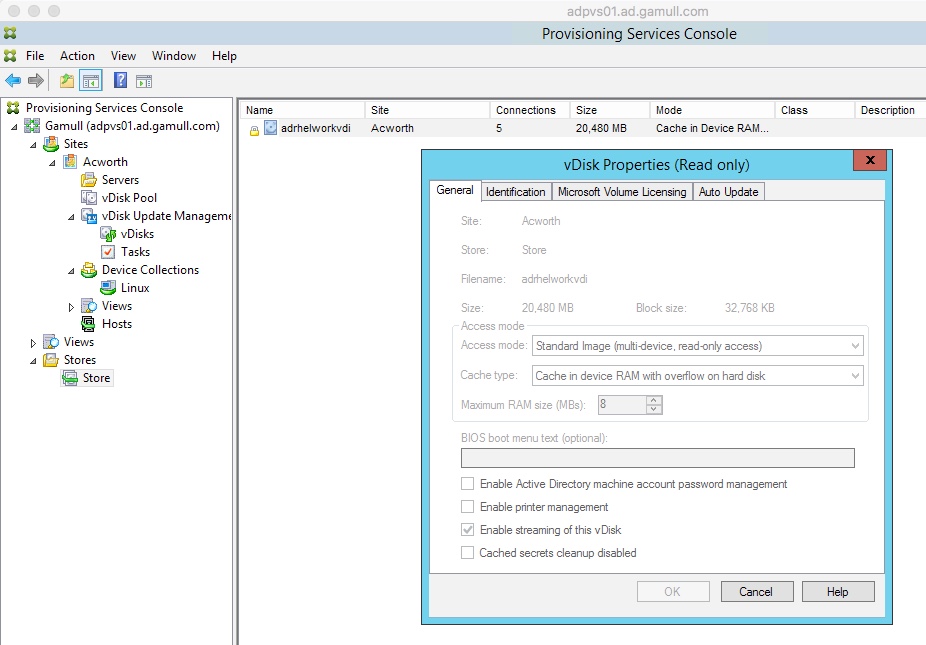
I am a big fan of stream to RAM but the notes on the Citrix site are a bit cryptic on the setting. I understand them to say that Linux uses the RAM for cache that is there (Linux manages this) so the cache maximum is just a reserve and you want this set low to 8MB which is what I did. I also have a disk setup as overflow. It is vital you name this PVS_Cache in the mkfs.xfs command. I didn’t try lvm because I didn’t think it would work, I suggest you stick to xfs or ext4. I love btrfs but unless you know a LOT about that filesystem I wouldn’t use it for default (the benefit of btrfs is generally the ability to add/remove disks from RAID without impact, kind of like lvm but lower level).
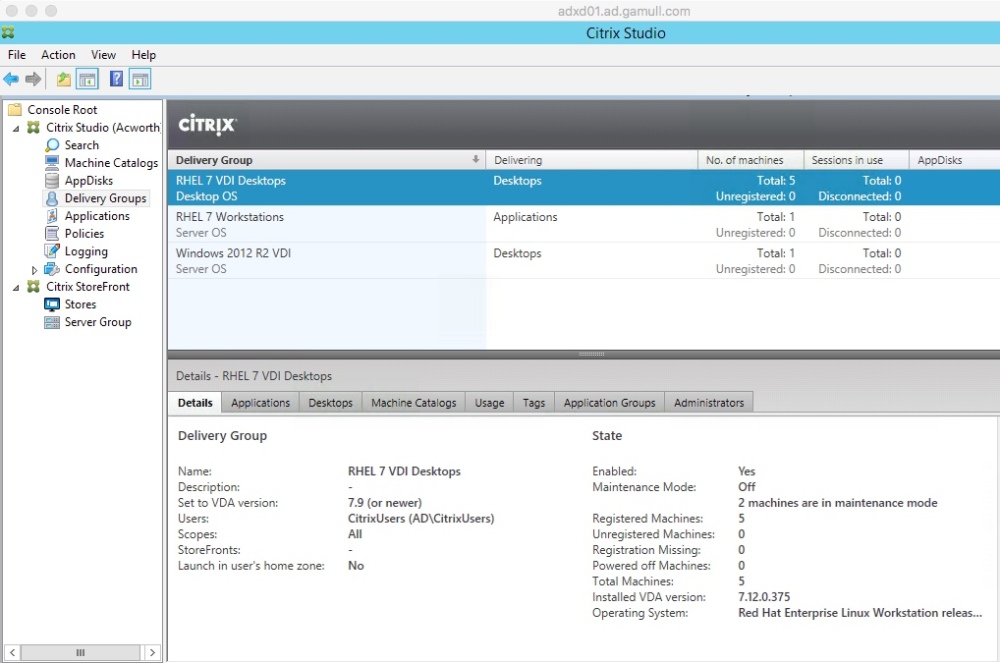
On the XenDesktop side, you can use the shared mode but I never had a lot of luck with the desktop there (Citrix said it should work so I’ll try later). I used the VDI mode for now.