Red Hat, Satellite

Satellite 6.2 error on update install or remove – /usr/share/ruby/tmpdir.rb:85:in `mkdir’: No such file or directory – /etc/katello-installer

Recently on a restore I got the following error for Satellite 6.2:

/usr/share/ruby/tmpdir.rb:85:in `mkdir’: No such file or directory – /etc/katello-installer/d20171010-14589-12we0i0 (Errno::ENOENT)

        from /usr/share/ruby/tmpdir.rb:85:in `block in mktmpdir’

        from /usr/share/ruby/tmpdir.rb:142:in `create’

        from /usr/share/ruby/tmpdir.rb:85:in `mktmpdir’

        from /usr/share/gems/gems/kafo-0.7.6.1/lib/kafo/configuration.rb:139:in `params_default_values’

        from /usr/share/gems/gems/kafo-0.7.6.1/lib/kafo/configuration.rb:194:in `block in preset_defaults_from_puppet’

        from /usr/share/gems/gems/kafo-0.7.6.1/lib/kafo/configuration.rb:193:in `each’

        from /usr/share/gems/gems/kafo-0.7.6.1/lib/kafo/configuration.rb:193:in `preset_defaults_from_puppet’

        from /usr/share/gems/gems/kafo-0.7.6.1/lib/kafo/kafo_configure.rb:251:in `set_parameters’

        from /usr/share/gems/gems/kafo-0.7.6.1/lib/kafo/kafo_configure.rb:97:in `initialize’

        from /usr/share/gems/gems/clamp-0.6.2/lib/clamp/command.rb:125:in `new’

        from /usr/share/gems/gems/clamp-0.6.2/lib/clamp/command.rb:125:in `run’

        from /usr/share/gems/gems/kafo-0.7.6.1/lib/kafo/kafo_configure.rb:148:in `run’

        from /usr/sbin/satellite-installer:12:in `<main>’

Thankfully I wasn’t the first one and it looks like this was an oversight when you have 6.1 and upgrade to 6.2 – https://bugzilla.redhat.com/show_bug.cgi?id=1422905

Apparently the directory for the answers was changed from /etc/katello-installer to /etc/foreman-installer/scenarios.d

The fix is rather simple, all you need to do is edit the /etc/foreman-installer/scenarios.d/satellite.yaml and modify the following line to what is shown below

  :default_values_dir: /etc/foreman-installer/scenarios.d

After that, no more errors.  The community is fixing this upstream and it should be a non-issue soon enough but if you hit this error, this is the fix.

Linux, Red Hat, Uncategorized

Every time you disable SELinux God kills a kitten

Anything that states you must disable selinux to get it to work should never be run in production or on a system outside a lab.

This post is to enable you to run selinux when others don’t know how. This post will make you better with linux if you have had trouble with selinux.  This post may even improve your life and all sort of other stuff.

Why care about selinux?

Too many articles out there that default to “just disable selinux” and it works.  From my windows days, this is very much the same as the “just disable User Account Control “UAC” and the windows firewall.”  The obvious reason not to do this is security and although security is hard, it is important. SELinux provides additional security and mandatory access controls in linux.  It confines applications so they don’t compromise or harm other processes.  Another way to think about this, is that SELinux is written to secure apps that aren’t inherently secure or as secure as they could be.  In short, you want to be secure and you want your stuff to work.

This guide will show you how to uncover anything selinux is blocking and add policies to allow the behavior with some pretty cool tools available.

How do I make this all work?

It’s important to note selinux has 3 modes of operations.  One is disable, this turns off everything and really should never be used unless you are in a locked down environment and require the sliver of performance lost by adding selinux.  enforcing mode turns selinux on and enforces the security that is set.  permissive turns selinux on but does not enforce the rules.  Use permissive instead of disabled.  When anyone says disabled selinux, they should be saying, make selinux permissive because I don’t know how it works.

Security Hardening

This guide is designed to harden the security on centos, rhel, fedora and any system that can install the tools and use selinux. The changes suggested here may impact your system and cause services or features to become unavailable without proper testing. By following this guide and understanding what you are doing, you should be able to prevent this. This guide will show you how to apply SELinux to your system and be alerted for anything that is blocked.

Minimum requirements

  • Linux kernel supporting selinux (should be anything after 2.6) – ideally a VM or testing installation
    • RHEL, Centos or fedora (ideally RHEL 7 or Centos 7 or higher)
    • other distros can work but I’m using yum below (use dnf for fedora)
  • SSH or terminal access to your system
  • Familiarity with vim or your favorite editor
  • Ability to use 2 terminals at once or screen

Installation

We first want to set selinux to permissive. Before we do this, it’s best to have your disks created and the structure setup. Permissive allows us to log all SELinux violations without preventing their actions. This is good because we can see what will be blocked. In addition, we will install some tools that almost tell us exactly how to unblock anything that does get blocked.

Let’s go ahead and install the tools, set permissive and reboot for it to take effect (you can do this without reboot but you’ll miss any issues that present themselves on reboot).

Install the extra tools

# yum -y install setroubleshoot-server setools mcstrans

Now let’s enable selinux in permissive mode. We need to reboot after to catch the logs. You can use vi on /etc/selinux/config or copy/paste the line below (check those file paths are the same on your system)

# sed -i 's/^SELINUX=.*/SELINUX=permissive/g' /etc/selinux/config && cat /etc/selinux/config
# systemctl reboot

Now once the system reboots, you will get some log entries that we can find out if SELinux is blocking anything. We want to find entries that indicate something it being blocked. Let’s search the messages log.

# cat /var/log/messages | grep "SELinux is preventing"

If no errors, let’s search for just “SELinux”

# cat /var/log/messages | grep "SELinux"

We should get something back like this if everything is ok.

Aug 10 15:43:09 Rocky3 kernel: SELinux: Initializing.
Aug 10 15:43:13 Rocky3 kernel: SELinux: Disabled at runtime.
Aug 10 15:51:15 rocky3 kernel: SELinux: Initializing.
Aug 10 15:51:17 rocky3 kernel: SELinux: Disabled at runtime.
Aug 10 15:52:39 rocky3 kernel: SELinux: Initializing.
Aug 10 15:52:41 rocky3 kernel: SELinux: Permission validate_trans in class security not defined in policy.
Aug 10 15:52:41 rocky3 kernel: SELinux: Class netlink_iscsi_socket not defined in policy.
Aug 10 15:52:41 rocky3 kernel: SELinux: Class netlink_fib_lookup_socket not defined in policy.
Aug 10 15:52:41 rocky3 kernel: SELinux: Class netlink_connector_socket not defined in policy.
Aug 10 15:52:41 rocky3 kernel: SELinux: Class netlink_netfilter_socket not defined in policy.
Aug 10 15:52:41 rocky3 kernel: SELinux: Class netlink_generic_socket not defined in policy.
Aug 10 15:52:41 rocky3 kernel: SELinux: Class netlink_scsitransport_socket not defined in policy.
Aug 10 15:52:41 rocky3 kernel: SELinux: Class netlink_rdma_socket not defined in policy.
Aug 10 15:52:41 rocky3 kernel: SELinux: Class netlink_crypto_socket not defined in policy.
Aug 10 15:52:41 rocky3 kernel: SELinux: Permission audit_read in class capability2 not defined in policy.
Aug 10 15:52:41 rocky3 kernel: SELinux: Class binder not defined in policy.
Aug 10 15:52:41 rocky3 kernel: SELinux: the above unknown classes and permissions will be allowed
Aug 10 15:52:41 rocky3 systemd[1]: Successfully loaded SELinux policy in 69.596ms.

If something is being blocked we would see something like:

Aug 10 16:10:18 rocky3 setroubleshoot: SELinux is preventing /usr/sbin/nmbd from getattr access on the file /etc/samba/smb.conf

If you have any errors, please see the troubleshooting part of this document before enabling the enforcing mode. For clean installs without any additional services, you should not see any errors.

Once again, if you see errors, go to the troubleshooting section. If you installed a program, you’ll likely see selinux blocking something.

Let’s enable enforcing now that we have no errors.

# sed -i 's/^SELINUX=.*/SELINUX=enforcing/g' /etc/selinux/config && cat /etc/selinux/config
# setenforce 1

It is a good idea to now check for errors again but you should not see any if this was done right. We can run the sestatus command to check selinux status.  If you see errors, resolve them before you reboot!!!

# sestatus

Should show the following:

SELinux status: enabled
SELinuxfs mount: /sys/fs/selinux
SELinux root directory: /etc/selinux
Loaded policy name: targeted
Current mode: enforcing
Mode from config file: enforcing
Policy MLS status: enabled
Policy deny_unknown status: allowed
Max kernel policy version: 30

now let’s reboot and check once again to ensure selinux is enforcing and we don’t have additional errors

systemctl reboot
getenforce
sealert -a /var/log/audit/audit.log

Troubleshooting

Resolving log messages

Some other places to look for errors include utilizing the sealert tool, this tool not only shows the error but shows how to fix the error with confidence scores indicating how sure it thinks it is.

When we search in /var/log/messages, we may have a message similar to the one below. Note the last sentence, which says what command to run.

Aug 10 16:11:05 rocky3 setroubleshoot: SELinux is preventing /usr/sbin/nmbd from read access on the file smb.conf. For complete SELinux messages. run sealert -l 109d0656-c57b-4fdd-9ef3-09c6cee6351a

When you run that command, you’ll get an output similar to the one below. Note the confidence scores and resolutions. Look up what they do (don’t blindly trust everything please). The following output indicates that SELinux is preventing the smbd service from modifying the smb.conf file.

SELinux is preventing /usr/sbin/smbd from open access on the file /etc/samba/smb.conf.

                                            *****  Plugin restorecon (60.0 confidence) suggests   ************************

                                            If you want to fix the label. 
                                            /etc/samba/smb.conf default label should be samba_etc_t.
                                            Then you can run restorecon.
                                            Do
                                            # /sbin/restorecon -v /etc/samba/smb.conf

                                            *****  Plugin samba_share (30.8 confidence) suggests   ***********************

                                            If you want to allow smbd to have open access on the smb.conf file
                                            Then you need to change the label on '/etc/samba/smb.conf'
                                            Do
                                            # semanage fcontext -a -t samba_share_t '/etc/samba/smb.conf'
                                            # restorecon  -v '/etc/samba/smb.conf'

                                            *****  Plugin catchall_boolean (5.26 confidence) suggests   ******************

                                            If you want to allow samba to export all ro
                                            Then you must tell SELinux about this by enabling the 'samba_export_all_ro' boolean.

                                            Do
                                            setsebool -P samba_export_all_ro 1

                                            *****  Plugin catchall_boolean (5.26 confidence) suggests   ******************

                                            If you want to allow samba to export all rw
                                            Then you must tell SELinux about this by enabling the 'samba_export_all_rw' boolean.

                                            Do
                                            setsebool -P samba_export_all_rw 1

                                            *****  Plugin catchall (1.09 confidence) suggests   **************************

                                            If you believe that smbd should be allowed open access on the smb.conf file by default.
                                            Then you should report this as a bug.
                                            You can generate a local policy module to allow this access.
                                            Do
                                            allow this access for now by executing:
                                            # grep smbd /var/log/audit/audit.log | audit2allow -M mypol
                                            # semodule -i mypol.pp

To resolve this, we want to have smbd access to the smb.conf file. We are saying that service can now access it. SELinux was protecting us from some service just using that file or modifying it, which is a good thing! In the samba section we will run the commands to enable smb.conf access and also read/write if desired.

sealert usually targets a log file with the -a option. These usually will give you the messages you need.

# sealert -a /var/log/audit/audit.log

Samba

When you enable Samba, you’ll start getting audit messages.  This is because it doesn’t allow modifying smb.conf which is what you are doing (you’re adding lines to the bottom of the file indicating what shares you want to export). To allow this we need to allow access and also allow read only or read/write.

# semanage fcontext -a -t samba_etc_t /etc/samba/smb.conf
# restorecon -Rv /etc/samba/
restorecon reset /etc/samba/smb.conf context system_u:object_r:tmp_t:s0->system_u:object_r:samba_etc_t:s0

We just set the security context on smb.conf so it is able to be used. Restorecon is necessary because it sets the contexts correctly on the files and directories.

Below is a blanket boolean to allow samba rw/ro access. It would be better to set this for the directories you share rather than all over but for now, we will just set it. Use ro for read only or rw for read/write

 # setsebool -P samba_export_all_ro 1

OR

 # setsebool -P samba_export_all_rw 1

NFS

I haven’t found anything blocking NFS yet.

Docker

These will vary by container so anytime you add a container you should check sealert or grep in /var/log/messages for an error.  In general, this is more likely to come up with persistent volume mapping or exposing external ports. The other area to keep an eye on is sharing volumes between containers. This worked for me but I would always check after enabling.

Importing new pools or adding disks or btrfs

This is going to be the scariest area here. SELinux adds contexts to files and directories and if this gets messed up, you won’t be able to access much. BEFORE you do this, I would likely just go into /etc/selinux/config and set everything to permissive just in case. Do the import, double check the logs then set it back to enforcing.

Linux, Red Hat, RHV, XenDesktop

Using Citrix PVS to stream Linux VDA (RHEL 7 Workstation)

I’ve been waiting a while to see this day and a sneaky section of the Citrix XenDesktop/PVS 7.12 notes indicate not only a lot more stability for the VDA Agent on RHEL but also that PVS supports (again) Linux targets!

If you’re not familiar with RHEL 7.x (7.3 in this case) you likely can use the same methods with CentOS 7 and Fedora.  If you don’t have a RHEL subscription, I would urge you to use CentOS 7, however, you can get a RHEL 7 subscription on the Developer portal (register here) (note it may just say 7.2 but once you run yum update and reboot it’ll be 7.3).

Let’s set the stage with what we are doing here.  We will be installing Red Hat Enterprise Linux (RHEL) Workstation 7.3 and configuring it to be a VDI Desktop in Citrix XenDesktop 7.12.  We are also using PVS 7.12 to stream a gold image to a VM that PXE boots and uses a cache disk (I choose to use cache to RAM overflow to disk).  Everything below is done as root for now. If you don’t like that, feel free to do it your own way but this is just a workstation we’re talking about here.

Install RHEL 7 Workstation

First thing you should do is install a VM, I’m using RHV4 and my VM consists of 2GB Memory, 1 vCPU and a 20GB disk.  The installation follows the guidelines in the documentation.  While their is an easy install option, we want to use the recommended best practice from Red Hat and leverage SSSD rather than samba.

First thing to notice is you need to scroll down to the section entitled “Prepare RHEL7/CentOS 7 for VDA Installation” which is not the first one (that is RHEL 6). Make sure you install Workstation and subscribe to get updates.  If you’re using RHEL you’ll need to run something similar to this

subscription-manager register
subscription-manager attach --pool={POOLID}
subscription-manager repos --disable=*
subscription-manager repos --enable=rhel-7-workstation-rpms \
                           --enable=rhel-7-workstation-extras-rpms \
                           --enable=rhel-7-workstation-optional-rpms \
                           --enable=rhel-7-workstation-rh-common-rpms
yum clean all
yum install screen wget vim bash-completion git
yum update -y
#reboot if kernel is updated
systemctl reboot
#for ovirt/rhv I will install guest tools
yum install -y rhevm-guest-agent
#if there is a bridge reported you might need to remove it before proceeding
#this would show up as some 192.x.x.x address in addition to your desired IP
#that wont play well with PVS and the VDA generally
#if that happens you can remove them with
#virsh net-destroy default
#virsh net-undefine default
#ifconfig #shouldnt have a virbr0 anymore

Follow the guide for setting the hostname and check hostname and hostname -f return the right values.  The command below enforces the hostname immediately.

hostnamectl set-hostname myhostname

Now modify chrony.conf for your ntp servers. You can use the following if you wish to run this in bash. Replace the IP addresses with the correct ones. (make sure you scroll to the right as the lines are long if you’re copy/pasting here)

sed -i 's/server 0.rhel.pool.ntp.org iburst/#server 0.rhel.pool.ntp.org iburst/g' /etc/chrony.conf
sed -i 's/server 1.rhel.pool.ntp.org iburst/#server 1.rhel.pool.ntp.org iburst/g' /etc/chrony.conf
sed -i 's/server 2.rhel.pool.ntp.org iburst/server 10.1.10.92 iburst/g' /etc/chrony.conf
sed -i 's/server 3.rhel.pool.ntp.org iburst/server 10.1.10.2 iburst/g' /etc/chrony.conf
systemctl restart chronyd

For JAVA, this is strange but if you use the default RHEL7 install the docs won’t work, that’s because they don’t have a symlink where Citrix says there is.  You should have java already installed if you’re using RHEL. I would recommend installing 1.8.0-openjdk and don’t remove the 1.7.0 if you’re using RHEL 7.2+ or CentOS7.  The path you want is /etc/alternatives/java. Let’s set it and source it in .bashrc (this will now always be a variable when you log in).

echo "export JAVA_HOME=/etc/alternatives/java" >> ~/.bashrc
. ~/.bashrc

Installing postgres should be simple, you can initialize without fear before we seal/clone so let’s do that.

yum install postgresql-server postgresql-jdbc -y
postgresql-setup initdb

systemctl start postgresql
systemctl enable postgresql

At this point you are ready for stage 2, the AD prep.  If you’re using XS or ESXi read the appropriate sections in the document.  I use Red Hat Virtualization because I like to live dangerously (and they also are my employer).

Active Directory Join (well not really)

This part can actually be done entirely and then we can remove the VM from the domain and clear credentials.  This isn’t a bad thing and if you do this, you’ll just want to leave the domain and delete the /etc/krb5.keytab (plus a few other things).  However we are going to do everything but join the domain at this point and leave that for later.

I HIGHLY SUGGEST you take a snapshot at this point.  If you love repeating steps (like the ones above, then ignore me but more than likely you’re going to mistype something here and need to revert).

Winbind sucks, so skip that part. We’re going with the latest, greatest SSSD.  My colleague, Dmitri Pal, discusses the best practice here if you’re a diehard winbind junkie.

Let’s run authconfig but also, we can specify all our variables up front now so you can just copy and paste and get on with life.  You can download them from this github and modify. Just follow the commands below

git clone https://github.com/magicalyak/citrixpvslinux.git
cd citrixpvslinux
vim variables.sh #edit the file changing the options particularly the line on the Auth method to 4 if you're using SSSD
chown root:root variables.sh
chmod 600 variables.sh
. ./variables.sh

If you type export and hit enter you should see the variables loaded for you.  We only want them for configuration so we load them now by sourcing the file (the . command above) and we will again after we create the gold image.

Let’s run our authconfig command now and modify the /etc/samba/smb.conf. You can run the github script or follow along. We aren’t joining the domain just yet though.

authconfig --smbsecurity=ads --smbworkgroup=${ADJOIN_SHORT} --smbrealm=${ADJOIN_REALM} --krb5realm=${ADJOIN_REALM} --krb5kdc=${ADJOIN_DC} --update
sed -i '/#--authconfig--end-line--/a kerberos method = secrets and keytab' /etc/samba/smb.conf

We will now prep the image a bit more for the PVS section, here we are writing in a file using our variables. You should check the file to be sure it looks right

cat >/etc/sssd/sssd.conf <

Now we are going to create a service that will join the machine to AD at boot time. We have to store the password in that file so we secure it, like we did above, with only root access.  This means you MUST be root to run this and access the file. Since we are going to join the machine with the command I HIGHLY suggest a minimum privileged account for this.  This guy seems to have a good walkthrough if you need one.  I also suggest you make an OU for the machines and add it as I have (it’s a variable in the export).  If you don’t do this, you’ll need to make the variable “Computers” or modify the command to join.

I suggest you use the github script and not copy and paste below.

#!/bin/bash

cat >/etc/systemd/system/ctxvdaoneshot.service < /usr/local/sbin/ctxvdaoneshot
chmod 700 /usr/local/sbin/ctxvdaoneshot

cat >>/usr/local/sbin/ctxvdaoneshot <

To use this we would actually run ‘systemctl enable ctxvdaoneshot.service’ but we’re not quite ready yet.

At this point we’re as far as we’re going to get on AD without actually joining the machine. So let’s fix some issues that are going to pop up (I didn’t see any notes on this but you likely need to make these changes, otherwise your users will get some warnings)

Fixing the Display Issues

Run the following to fix the popups that occur if someone has a printer or moves the screen.  Most guest tools leverage VNC and this will prompt some security warnings (you can hit cancel and ignore them) about the color management and one about proxy for updates.  These are annoying and not easily fixed.  So the steps below will fix these issues by ignoring those warnings for anyone in the Domain Users group. Github script here.

(Update: Citrix had a ctx article on this now – https://support.citrix.com/article/CTX219692)

sed -e '$aX-GNOME-Autostart-enabled=false' -e '/X-GNOME-Autostart-enabled/d' -i.bak /etc/xdg/autostart/gnome-software-service.desktop

sed -i 's/Exec=\/usr\/bin\/vmware-user-suid-wrapper/#Exec=\/usr\/bin\/vmware-user-suid-wrapper/g' /etc/xdg/autostart/vmware-user.desktop

cat >/etc/polkit-1/rules.d/02-allow-colord.rules <

If you have GRID cards then good for you.  I don’t so I’m not going over that part.  However, if someone were to donate some to me I’d be happy to add that part, straight up trade.

Install the VDA Agent

Ok now we need to install this agent.  You need to actually download the rpm and put it somewhere. I use a local http server but you can just put it in the root directory.  scp works great for this. If you’re on a mac the command is something like:

scp ~/Downloads/Citrix/XenDesktopVDA-7.12.0.375-1.el7_2.x86_64.rpm root@linuxvdafqdn:/root
# prompts for password of root and it will copy
# lets also copy the PVS agent (it is on the ISO for PVS 7.12)
scp ~/Downloads/Citrix/pvs_RED_HAT_7.12.0_BETA5_9201_x86_64.rpm root@linuxvdafqdn:/root

You should now have two rpm files in your ~ or /root directory. I guess you could use Citrix’s commands in the doc but I don’t do that. I generally always use the following for RPMs I find.  You can also use this for an rpm on a http site (just replace the location with the web address).

# install prerequisites if not already installed (it should warn you if not)
yum install -y ImageMagick motif foomatic-filters
rpm -Uvh ~/XenDesktopVDA-7.12.0.375-1.el7_2.x86_64.rpm
systemctl enable ctxhdx ctxvda

You may also need to fix the AD shortname.  I did.  To do this create the file /tmp/ctxinstall.conf and add the following line (replace AD with your netbios short name)

workgroup=AD

At this point we’ve completed the VDA setup without having joined the machine to the domain.  A reboot and snapshot is advisable at this point.

systemctl poweroff
# take a snapshot
# bring it back up
# source variables
cd ~/citrixpvslinux
. ./variables.sh

PVS Install

You should have the rpm in the /root directory or somewhere. Let’s go ahead and install it along with a prerequisite.

yum install -y tdb-tools
rpm -Uvh ~/pvs_RED_HAT_7.12.0_BETA5_9201_x86_64.rpm

The following commands are in this github script but you can follow along. We need to set selinux to permissive. This kind of sucks but another day I’ll work through that.  What you don’t want to do is disable selinux, you should NEVER be doing that honestly unless you’re exploring exploits or somehow time travelled prior to Y2K (buy some stock while you’re there!). Anyway let’s get this done.  I’m assuming selinux contexts aren’t transcribed properly when we stream the OS disk.

# Set to permissive for the immediate timeframe
setenforce Permissive
# Set it to persist on reboot (if you dont do this it will revert to enforced)
sed -i 's/SELINUX=enforcing/SELINUX=permissive/g' /etc/sysconfig/selinux

We also want to add our CA Trust because PVS runs securely now and the linux target need to trust the issuer.  You could use the option for self-signed in the citrix docs, but I’m assuming you’re serious about this and have a CA somewhere you can spin up a cert for.  You can grab the cert from the CA by using this command (it’s also part of the script).

openssl s_client -showcerts -connect ${ADJOIN_CA}:443 /dev/null|openssl x509 -outform PEM > /etc/pki/ca-trust/source/anchors/${ADJOIN_CA}.pem
# or copy the ca to /etc/pki/ca-trust/source/anchors
update-ca-trust extract

Now let’s add a Cache Disk for PVS to use, I set mine up for 10G and created it without rebooting or shutting down.  My main disk is /dev/vdb and the new disk is /dev/vda.  I think you need to have the PVS_Cache be the first disk because linux won’t preserve naming automatically.  If you used my script from github at this point, just ensure the variables are right and run it or run the following.

#export TGTDEV=/dev/vda
sed -e 's/\s*\([\+0-9a-zA-Z]*\).*/\1/' << EOF | fdisk $TGTDEV
 o # clear the in memory partition table n # new partition p # primary partition 1 # partition number 1 # default - start at beginning of disk # default, extend partition to end of disk p # print the in-memory partition table w # write the partition table q # and we're done EOF
mkfs.xfs -L 'PVS_Cache' ${TGTDEV}1

After this it’s time to seal up and convert our VM to a PVS image.  You’ll want to remove the subscription-manager info also to clear that for use but you can leave the hostnames alone since PVS will change them for you.  The github script for this part is here.

Let’s cleanup yum and also enable the vdaoneshot script too.  We assume you have the collection, store name and all that info correctly inputted to the variables.sh or export.

yum clean all
subscription-manager unregister
subscription-manager remove --all

systemctl enable ctxvdaoneshot

# Lets create this
pvs-imager -C -a ${PVS_IP} -u ${PVS_USERNAME} -p ${PVS_PASSWORD} -d ${ADJOIN_SHORT} -P ${PVS_PORT} -S ${PVS_STORE} -c ${PVS_COLLECTION} -n ${PVS_DEVICENAME} -v ${PVS_VDISKNAME} -D ${DISKDEV}

echo "If something went wrong please run: systemctl disable ctxvdaoneshot"
echo "before rebooting...."
echo "If you succeeded, please clone this image and remove the OS disk"
echo "Then create a template, create the VMs and add them to the collection in PVS"
echo "DO NOT FORGOT to set the boot order to use the NIC first"
echo "You also should have options 66/67 set in DHCP (they are the same old options from years ago)"

At this point you should be creating your image.  You’ll want to clone, remove the OS disk and then make additional VMs based on that VM. I had to manually create the additional VMs in PVS, transcribing the MAC addresses but it works.  This method creates Desktop VDI machines so select that when you create the machine catalog and delivery groups in XenDesktop.
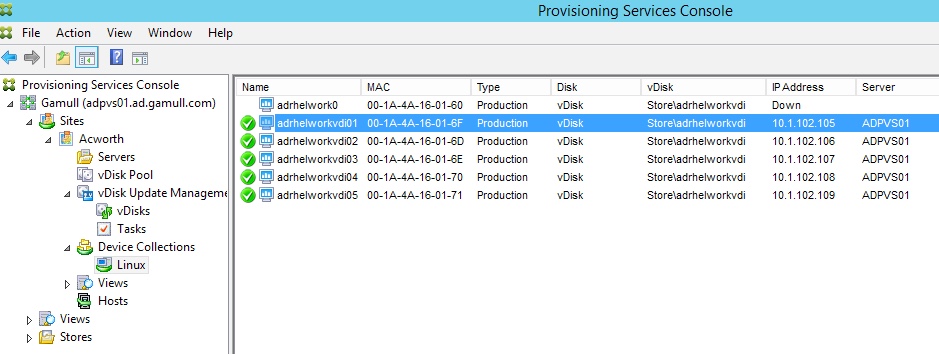
pvslinuxlist

Once all is complete you should be able to see your images and launch a desktop!

EDIT (12/22/16): I wanted to also mention the setup on the PVS side and XD side.

I am a big fan of stream to RAM but the notes on the Citrix site are a bit cryptic on the setting.  I understand them to say that Linux uses the RAM for cache that is there (Linux manages this) so the cache maximum is just a reserve and you want this set low to 8MB which is what I did.  I also have a disk setup as overflow.  It is vital you name this PVS_Cache in the mkfs.xfs command. I didn’t try lvm because I didn’t think it would work, I suggest you stick to xfs or ext4.  I love btrfs but unless you know a LOT about that filesystem I wouldn’t use it for default (the benefit of btrfs is generally the ability to add/remove disks from RAID without impact, kind of like lvm but lower level).
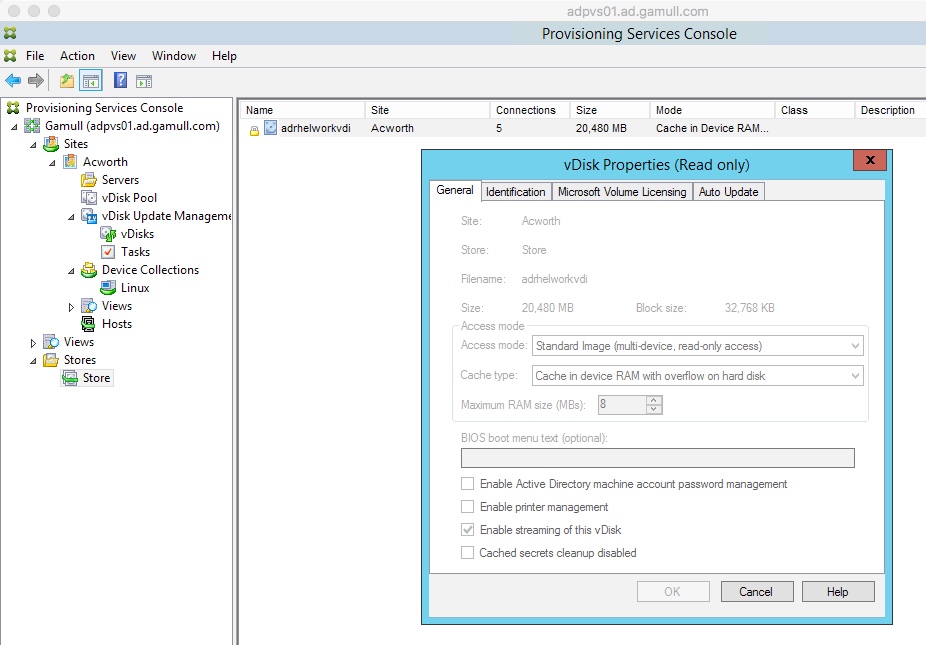
pvsvdiskcache

On the XenDesktop side, you can use the shared mode but I never had a lot of luck with the desktop there (Citrix said it should work so I’ll try later). I used the VDI mode for now.
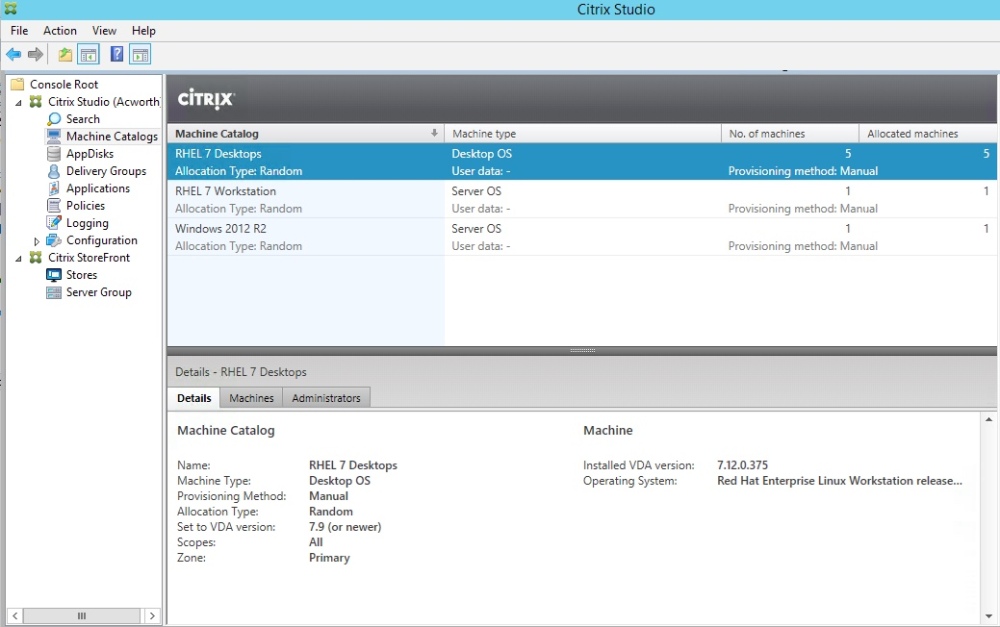
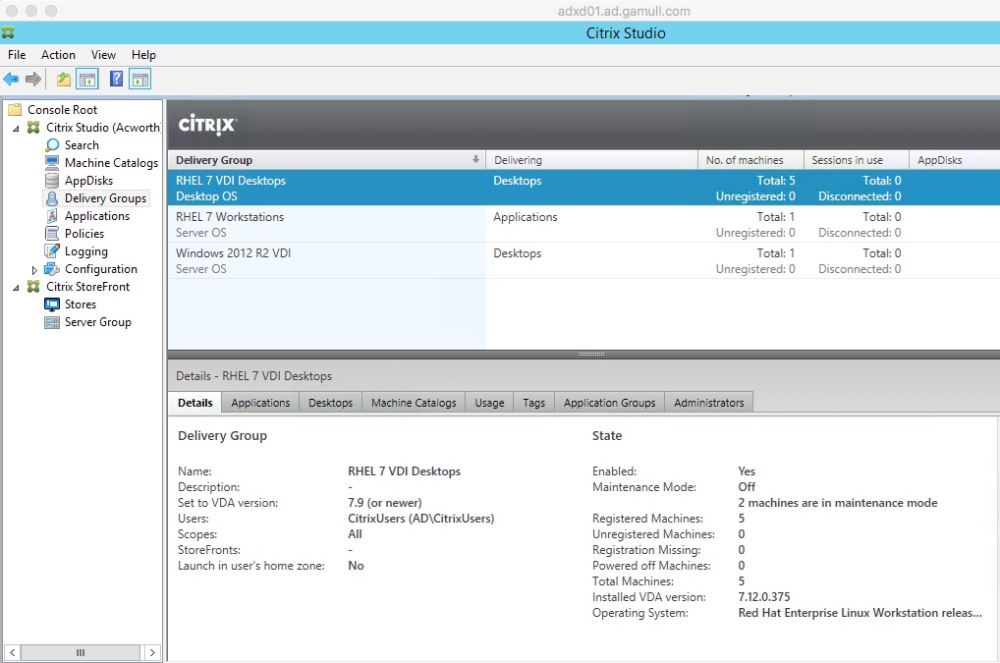
xdmachinecatalogxddeliverygroup

Career, Uncategorized

What would you say you do here?


When people ask me what I do it always puts me on defense trying to figure out how much knowledge you could handle and then speaking within a few seconds.  I heard a colleague, John Willis, speak and he discussed the standard response of “computers” which is a solid answer to avoid a long discussion.  Even better, a former colleague, who was an amazing saleswoman at EMC, used to say “I sell bananas!” when it was clear there was nothing happening.

I’ve thought about this a lot and kept thinking back to Officespace with the Bobs asking Tom Smykowski the question above.  Tom responds with a painfully obvious “nothing useful” that he seems to realize as he says it.  Basically he brings the specs to the engineers from the customers so the engineers don’t have to. When the Bobs ask why can’t the engineers bring them to the customers themselves, Tom shouts that he is a people person, gets flustered and exhorts, “What is wrong with you people!”.

While I don’t think my job or most others falls into this, it’s important to be able to describe what you do.  There is a saying that if you truly understand a subject, you can explain it to anyone, even a child.  I believe this to be true and I think it’s important that those in IT be able to understand their job and be able to explain it.

If you’re wondering, I have tried explaining what I do to my kids and wife with varying degrees of success.  I’d also encourage you to do the same.  If you get flustered or worried, I think you have every right to circle back to your manager or senior level company person and get some answers.  If they don’t know, take advantage of that open-door policy the CIO or CEO always brags about.

In DevOps, I always stress Value Stream Mapping.  This is a process where we take a workflow that involves our business (like a customer ordering a product and us making it) and we break it up into boxes, visually, and look at cycle times, delays and where we are in the process.  It’s important to do this visually because we don’t always see the big picture clearly when we are on the floor or entrenched in work.  It’s also invaluable because it shows where you add value (or where you don’t) and gives you the opportunity to change that.  You can see that when I do this, I do not add any value to the overall goal, or you may find that you are adding tremendous value and not realizing it.  In any case, the goal is to understand how your company works, how it makes money and where you are in the process.  If you take this and apply it to IT, you should find that your role is a part of the business and does add value.  If not, or if no one knows how your company works, you should start asking questions and looking for better opportunities.

Today I work at Red Hat. Red Hat takes community projects and turns them into enterprise products.  If that’s hard to grasp we take free software and add support and stability for companies to use and be able to trust.  I get paid based on the sales made from the 2 salesmen I support.  Our products help businesses focus more on their business and less on IT.

Next time you want to say computers, try to explain it.  If you fail, you’ll get another shot.  However I think in time, you’ll either learn to explain what you do to anyone or realize you can do something a lot more worthwhile.


Citrix, Uncategorized

Citrix Synergy as CTP

Getting to attend Synergy 2016 is one of the perks that accompanies being a CTP.  You also have responsibilities that come with this but I’m finding the perks seem to outweigh them!

I joined Red Hat last week and I think I’m the only Red Hatter here (I get weird looks with my hat but that’s on purpose).  Citrix is heavily aligned with Microsoft, Microsoft announced Red Hat on Azure and there has always been interest in VDI with Linux.  That being said, I get to come to Synergy as more an outsider than ever before (instead of from the customer or partner side).

CTPs have quite a few meetings lined up when they come to Synergy that start 2 days earlier than the kickoff.  These meetings are no joke and I got plenty of warnings about pacing myself.  They started at 8am promptly and continued to about 7pm two days in a row with few breaks.  The topics are intense and interesting and it’s easy to get overwhelmed.

The meetings are generally with the Citrix product teams and we get to learn and give feedback to new releases, ideas, successes and failures.  Each team is different in terms of how they operate.  I can’t go into too much detail but Citrix is very interested in improving their feedback loops and ensuring that products developed have purpose instead of just throwing things over a wall and surprising people.  This is a good move as it allows a lot more trail and error, and a lot less of “what the f is this thing?” when something in announced.  This is definitely the primary interest I had with my CTP meetings, in addition to the awesome company!

This year I’m not speaking at a breakout but doing some other activities.  I’ll be at the Synergy Showdown #XAonAzure with my team, the Village Idiots, along with Esther, Jarian and Paul from the CTP team.  We will be taking on the wily dutch team but our secret weapon hails from the Netherlands (Esther) so we are a lock in to win 😉 !  I will also have a few match.geek sessions if you want to hear me blather on about whatever you want and I’m hosting the education tech chat tables (except for today, Tobias will be doing Tuesday’s due to the showdown).

Today was fun, I got to sit at the bloggers table and get super secret early access the the keynote.  Esther even got me a front row table seat and the view is spectacular.  If you don’t think a CTP has perks, you’re mistaken and this is one of the best perks I’ve ever had.

If you’re here and want to connect, let me know. You can look for a dude wearing a red hat (literally) and it’s likely me or DM on twitter or the Synergy app. Looking forward to the rest of the week and running into old friend and making new ones!

Career, Red Hat, Uncategorized

First week at Red Hat

I recently joined Red Hat on May 16th and spent a few days in Raleigh at orientation.  I can’t think of a time before that I felt as good a fit as at Red Hat.  Don’t get me wrong, this isn’t a job to sit on your ass, however, if you work hard, you are rewarded.  The company culture seeps out of people and as best I can describe it, it is basically one of common sense.  Nothing overly crazy, but a lot of thought put into decisions, then once made, they are implemented quickly.

For any of you wondering why I made this move, I had spent the last year at Ericsson working on a very large OpenStack rollout with AT&T.  What we did was great but, my heart lies with presales and I couldn’t pass this opportunity up.  I’ve always tinkered and been a hobbyist with Linux and love the thought of having a career with it.

I have no idea how much I can weld my past technologies with what I am doing today but time will tell and you have to make changes in life.  Nevertheless, I am at Citrix Synergy next week in Vegas, so if you’re out there let me know and we can meet.

OpenStack, Uncategorized

OpenStack Summit – keynotes

Thanks to Champions Solutions Group, I’ve been able to attend the OpenStack Summit this year, 2016, in Austin, TX.  The event is interesting considering my experience with other conferences.  Generally I attend those that are geared towards partners, customers and sales. However, OpenStack is geared to a wide audience, but especially towards the engineers, architects and users which makes me feel right at home.

Highlights included the attendence of 7500 people and also the revelation that 65% of deployments of OpenStack are now production deployments!

OpenStack’s keynotes focused on a few themes.  Donna Scott from Gartner was correct in pointing out “disruption” as a key motivator explaining bimodal methods of deployment (mode 1 being reliable stable and mode 2 more experimental but agile). AT&T presented their challenges and wowed the audience with the rate of growth of mobile data (150,000% from 2007-2015!).  They are adopting a white box solution to lower cost, increase speed and agility. They also talked about a management layer for mult-tenant, complex networks.

Mirantis had a great presentation and poked at Gartner on their past of saying OpenStack wasn’t a real player (but that it’s in the past and happy they are hear).  After some story about Russian and vodka drinking bears, Mirantis made some excellent points.  Namely, people and process over tools and technology.  This is exactly the core of DevOps and if you know me, is a good overall view (I wish they went into value stream mapping a bit but it’s a start!).  They also pointed out that while they are a big AWS fan, there is ENORMOUS market share outside AWS and AWS has a teeny part of it!  They also poked a little fun at the vmware guys (not all, I know many are embracing change) but that adopting agile and openstack without looking at people is a killer.  Namely public cloud adoption seems great because you don’t have to deal with the people, but it’s not cheaper or always better.

We also heard from SAP and VW and Red Hat.  Red Hat stayed on message with the 65% of deployments to production.  SAP explained their addressing the movement of the industry with a customer expecting instant response time with a tweet. VW explained the connected car and the use of cloud computing.

Day 2 had keynotes that focused on containerization.  QUite a lineup of presenters including Cisco, OVH, TWC and liveperson and smartcities (and more) spoke. I think the best highlight was the presentation by Google and CoreOS highlighting tectonic which overlays Kubernetes (https://tectonic.com/).  I may have got this wrong, but each kubernetes node can hold many containers and they run openstack components as containers. They demonstrated a horizonv2 to v3 upgrade and also self-healing by killing a neutron and then a nova node.  I was definitely impressed and need to shore up by kubernetes skills!


Citrix, PVS, Uncategorized

Citrix PVS and Managed Service Accounts gMSA

I’m a big fan of Managed Service Accounts because they are much more secure and aren’t easily exploited by human beings.  Basically, Active Directory controls the account with it being responsible for changing passwords.  While use of gMSA (group managed service accounts) is sometimes hit or miss, I didn’t find much on recent use with Citrix other than a vague “we support this” statement.

Carl Webster had a much older attempt with PVS (not sure whether he tried again or not) and I wanted to ensure that this worked on PVS 7.7 (just released).

You’ll need a couple of things

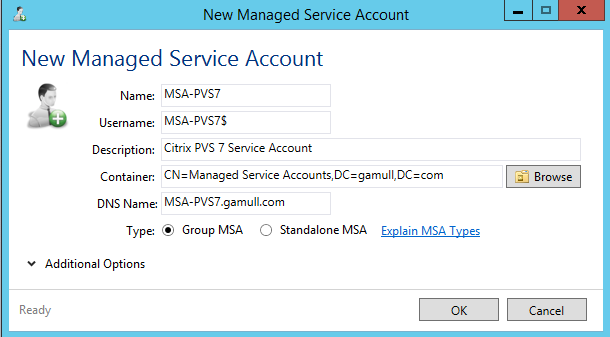
I would leverage a tool for creating and managing gMSA that I got here.
(note: for a quick guide on setting this up, I would look through Derek Seaman’s blog).

PVSgMSA

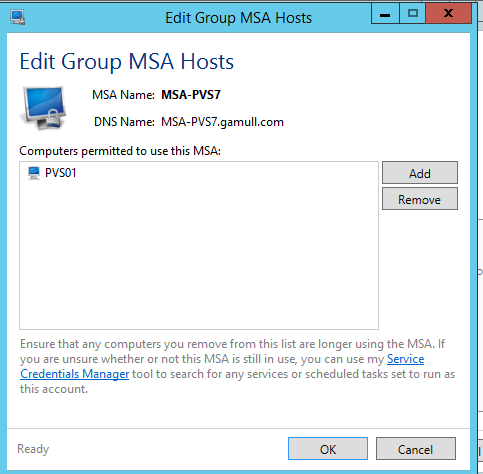
Add you PVS server to the list otherwise it won’t work. (I only have 1 PVS server right now, I’m in rebuilding mode…)

PVSgMSAComputer

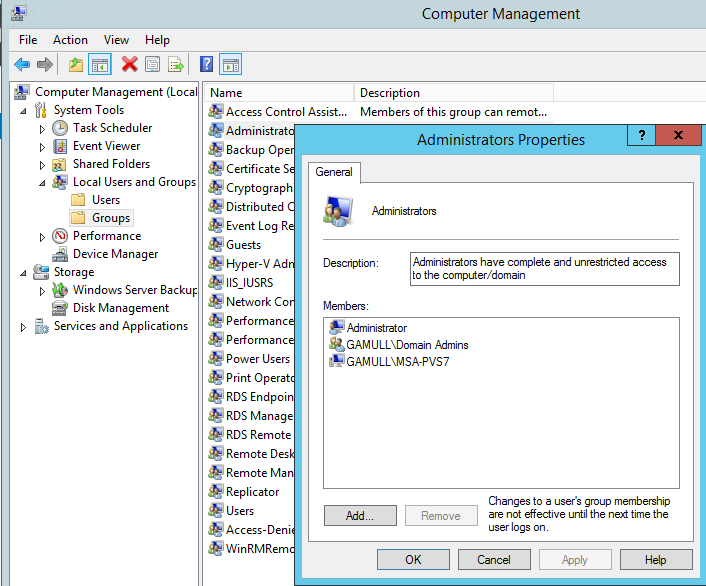
For SOAP, you’ll need to make this account a member of the local admins on the PVS server (when you add the account, make sure you select “service accounts” for objects.

LocalAdmin

For SQL, I am using 2014 with availability groups.  Check out Derek’s blog for a great walkthrough on this.

Your database should have been created already (use the dbscript.exe to manually create the database in PVS)

Grant the permissions needed to your gMSA on the SQL database (I create the account on both database servers just in case (when I test the failover))

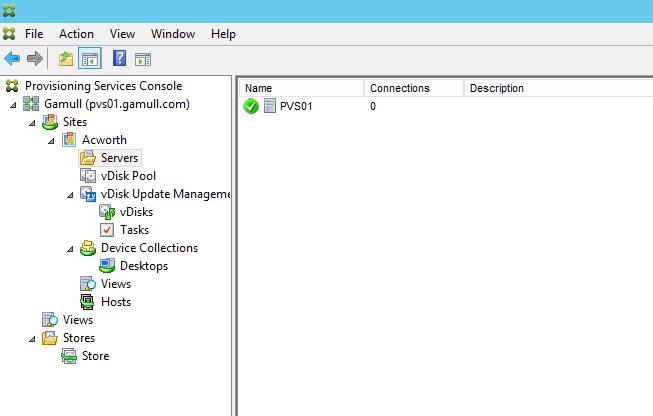
Testing failover should work and you will also notice the services are runningpvsconsoleservicespvs

Citrix, XenServer

FusionIO and XenServer

Getting FusionIO cards and XenServer to work seem to be a bit tougher than I thought but it’s possible. I have a few cards, some old servers and a XenServer 6.5 ISO.  I was hoping to use 6.6 but there isn’t a DDK up for that yet.

Install DDK 6.5
Increase the memory (I used 4GB) or you’ll run into errors on the RPM rebuild with out of memory

on XenServer 6.5

install lsof
yum install –enablerepo=base lsof

you’ll want to use the DDK to develop an RPM as specified here – https://www.linkedin.com/pulse/xenserver-unsupported-fusion-io-storage-devices-kyrian-arensman
Now you can download the HP stuff here – http://h20564.www2.hpe.com/hpsc/swd/public/detail?swItemId=MTX_54c57e1ffcaa42b19df32454ad#tab3But I wouldn’t I’d use the sources from FusionIO directly.  Download the Centos5 sources and all the Utilities from here – https://link-app.sandisk.com/Home/SoftwareDownload

Use WinSCP to upload the files to your DDK server
You should upload the Sources directory

run rpm –rebuild iomemory-vsl-*.src.rpm

Copy the rpm in the /usr/src/redhat/RPMS/x86_64 directory on the DDK to the XenServer
Also copy the utilities directory from the downloaded ZIP to the XenServer

Install
rpm -Uvh iomemory-vsl-*.rpm (you may need to do this in order)

You can ignore the dracut error (search for it in the pdf here)

Click to access iomemory-vsl-relnotes-en.pdf

cd to Utilities – run the following (check the order I may be wrong here but it’ll tell you)
rpm -Uvh fio-common*.rpm
rpm -Uvh fio-preinstall*.rpm
rpm -Uvh fio-util*.rpm
rpm -Uvh fio-sysvinit*.rpm

now run
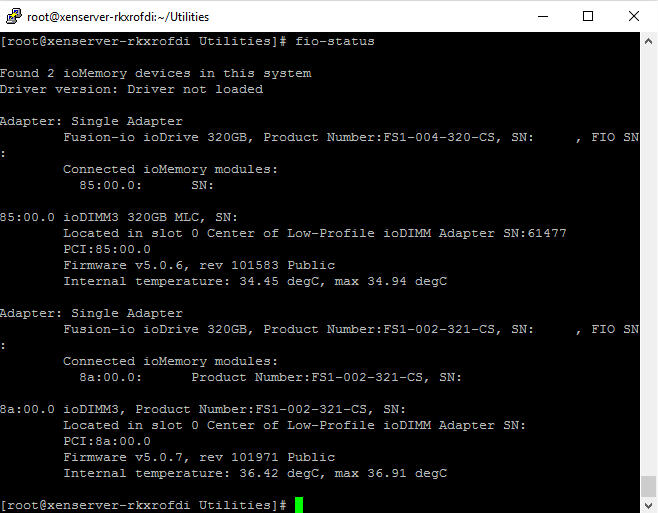
fio-status

fio-status

Note the driver version is empty? – now we are in sync with Kyrian’s blog post.
REBOOT

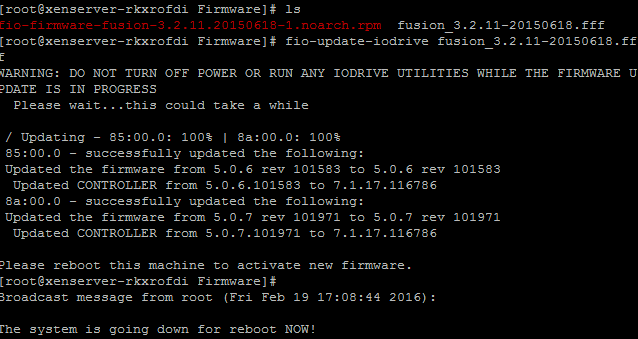
Run fio-status again – I had to upgrade the firmware on mine meaning I had to copy the firmware file *.fff to the XenServer and run
fio-update-iodrive

firmware

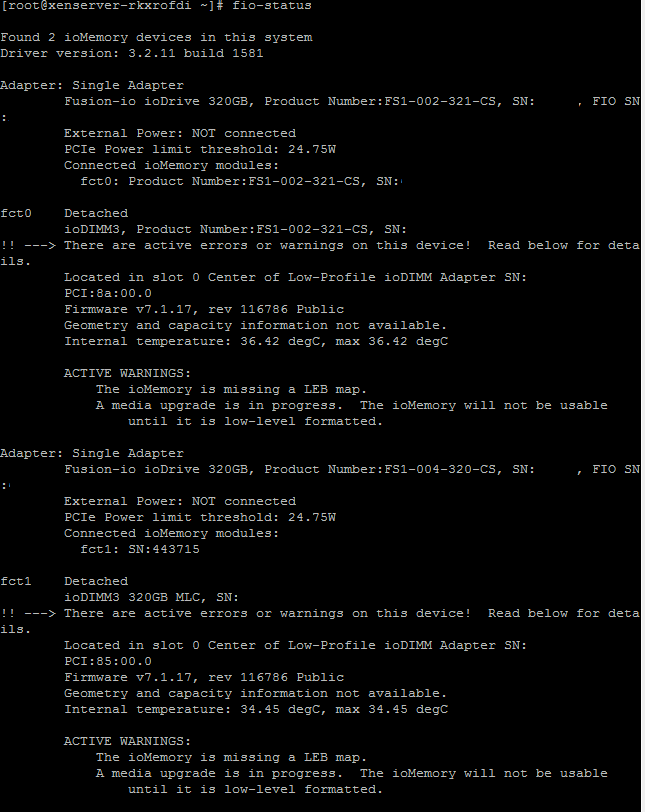
Then reboot and fio-status again. Now I have to wait for some low-level format but that’s ok…

fio-status2

I and listed what I had for /dev/fct* and performed the following command
fio-format /dev/fct0
fio-format /dev/fct1

Then attached them
fio-attach /dev/fct0
fio-attach /dev/fct1

After that fio-status looks good and we mount
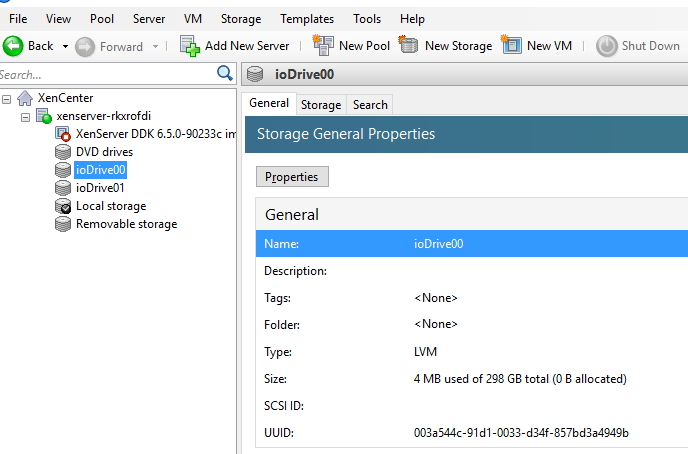
xe sr-create name-label=”ioDrive00″ physical-size=320Gb type=lvm device-config:device=/dev/fioa
xe sr-create name-label=”ioDrive01″ physical-size=320Gb type=lvm device-config:device=/dev/fiob

And we are done!

ioDriveXS

Career, Citrix

CTP 2016!

CTP-Logo-Horizontal-layout-transparent-background-360x206

I’m honored to be chosen as a CTP for the class of 2016!

It is exciting obviously for me, but also Champion Solutions to be able to speak on Citrix solutions for our customers! If you’re in Atlanta, feel free to reach out!

If you’re not sure what a CTP is, they are the top 50 Citrix experts or champions that are recognized for their contributions and technical expertise. There are only 50 people and this year included 6 new members. CTPs get to interact with the Citrix product team, provide input and also speak to the community. The other perk is they give you some discounts on Citrix Synergy which is in Las Vegas this year!

Thanks to all the current CTPs and congrats to all the new ones!

If you’d like to read more about the CTPs,  click here to read the current bios.

There is also a twitter list here.